
In this Post, We will learn How to create First Application in ASP.Net MVC 4.0. For Demonstration, I am using Visual Studio 2012 which include MVC 3 as well as MVC 4. If you don’t have ASP.Net MVC 4 installed on your system than go to http://www.asp.net/mvc/mvc4 and Click on install ASP.Net MVC for free.
 If you don’t know which version of ASP.Net MVC is already installed in your System than you can find it by visiting the Control Panel -> Programs and Features.


What is MVC?
MVC is a framework for building web application using three architectural component pattern i.e.
M: Model V: View C: Controller
Model is responsible for data access and known as Business Layer.
View contains the User Interface (U.I.) of the Application.
Controller is the Part of application which handles user request. As the name suggest, Controller controls the entire application.
Graphical Representation of MVC:
Create a New ASP.Net MVC Project:
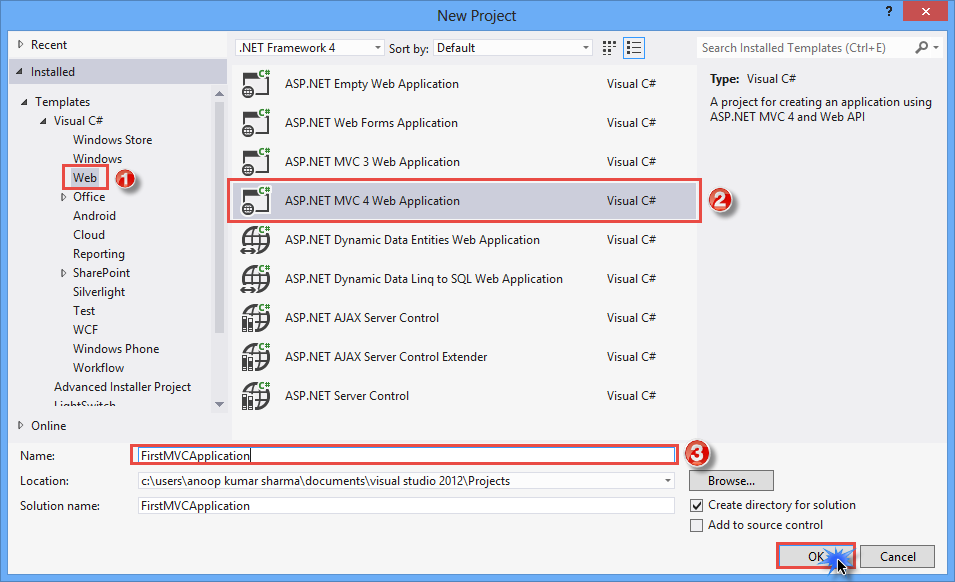
1) Go to File -> New -> Project
2) Under Web Template, Select ASP.Net MVC 4 Web Application and give it a meaningful name.
 Selecting MVC Project as Empty creates basic folder structure for the project. You will also see two View Engine ASPX and Razor. Razor view engine is new and improved view engine introduced in ASP.Net MVC 3. In Solution Explorer, you will see three main architecture components of ASP.Net MVC project that is Model, View and Controller.

1) Go to File -> New -> Project
2) Under Web Template, Select ASP.Net MVC 4 Web Application and give it a meaningful name.
And then click on OK. After that another dialog box opens.
3) Select Empty Template and View Engine as Razor.
If you try to run your Application, you will get HTTP 404 Error because we have created ASP.Net Empty Web Application and our application contains nothing/no files to display.
Let’s
Add a Controller in our MVC project. All of the request (by user) is handled by
Controller. Right Click on Controller Folder and then Go to Add -> Click on
Controller.
In Add Controller Dialog, Add Controller name as Home. By Convention, Every controller name ends with Controller Word so, our Controller name becomes HomeController. Never try to Remove Controller word from your Controller Name. In Scaffolding options, select Empty MVC controller template. This is our first application and we try to keep it as simple as possible.
After Adding the Home Controller, you will See HomeController with an Index method.
Make a Small change in Index Action method. Change the return type of Index method to string and Return a string i.e. "Hello World Application using ASP.NET MVC 4". We will learn about View and ActionResult in our next post.
using System;
using
System.Collections.Generic;
using System.Linq;
using System.Web;
using System.Web.Mvc;
namespace
FirstMVCApplication.Controllers
{
public class HomeController : Controller
{
public String Index()
{
return "Hello World Application using ASP.NET MVC 4";
}
}
}
|
Now Run the Application. You will see the following result.
If we type http://localhost:28473/home/index and press enter we will get the same result.
By Default, When we run ASP.Net MVC project, the request goes to Index Action method of HomeController. We can also specify which controller or Action method runs, on running the Project. All of these settings for URL mapping are present in RouteConfig.cs file present App_Start Directory.
In RouteConfig.cs, you will see url: "{controller}/{action}/{id}" means firstly we have to pass controller name and then action name separated by forward slash (/). We can also pass parameter which is Optional. Here you will see default controller specified as HomeController and default Action as Index.
using System;
using
System.Collections.Generic;
using System.Linq;
using System.Web;
using System.Web.Mvc;
using
System.Web.Routing;
namespace
FirstMVCApplication
{
public class RouteConfig
{
public static void RegisterRoutes(RouteCollection
routes)
{
routes.IgnoreRoute("{resource}.axd/{*pathInfo}");
routes.MapRoute(
name: "Default",
url: "{controller}/{action}/{id}",
defaults: new { controller = "Home", action = "Index", id = UrlParameter.Optional }
);
}
}
}
|
Let’s add another action method in HomeController.
public class HomeController : Controller
{
public String Index()
{
return "Hello World Application using ASP.NET MVC 4";
}
public String About()
{
return "This is our About us Page";
}
}
|
And we want to call About() action method of HomeController by default on running the application. So Go to App_Start Directory then click on RouteConfig.cs file. In routes.MapRoute method change the action to About. Now Build and Run the Project.
RouteConfig.cs Code:
routes.MapRoute(
name: "Default",
url: "{controller}/{action}/{id}",
defaults: new { controller = "Home", action = "About", id =
UrlParameter.Optional }
);
|
I hope you enjoyed this Post. If you have any query comment it below.
[Download Source Code via Google Drive]


0 comments:
Post a Comment