In this article, we will learn How to install SQLyog Community Edition in Windows Operating System. Currently, I am using it to access the MySQL Database. In case you are looking to install MySQL or MySQL Workbench then please check the below article.
Let’s Begin:
Go to Google and search for the SQLyog Community. Click on GitHub’s link to download the community edition.
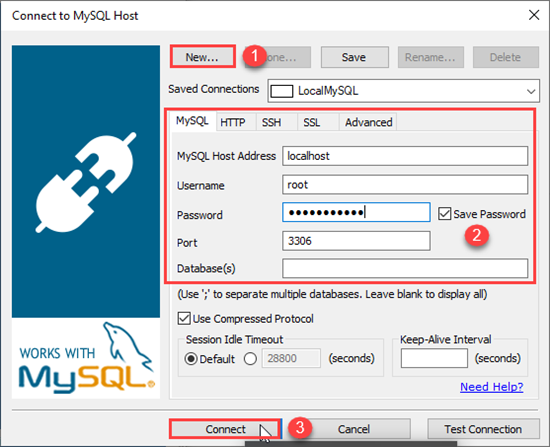
Download the SQLyog Community edition as per your system architecture. Double click on the downloaded SQLyog setup file to proceed with the installation. Select the Installer language and click on the Ok button. In the installation wizard, you will see a welcome message and some guidelines which need to be followed before starting the installation. Go through the license agreement, accept the term of the license agreement and click on the next button. Select the components you want to install and click on the Next button. Choose the destination folder where you want to install the SQLyog community edition. Click on the install button. Within a few moments, Installation will be completed. Click on the Next button. Click on the Finish button and run the SQLyog Community edition application. For the first time, SQLyog will ask you to select the UI language for your application. Select the language as per your requirement and click on the OK button. Click the New button in Connect to MySQL Host dialog and provide the MySQL database connection details which include MySQL Hostname, username, password, port, database, etc. Once all the fields are provided, click on the connect button.I already have a Sample Database on my local MySQL database server. For demonstration, I ran some queries which are returning result set successfully. I hope this article will help you in the installation of the SQLyog.


0 comments:
Post a Comment