Support us on YouTube by Subscribing our YouTube Channel. Click here to Subscribe our YouTube Channel

Wednesday, 3 December 2014

Hello World Application in Xamarin

In this Article, We will learn How to create a Simple Hello World Application for Android Device using Xamarin / Mono for Android. Before Starting, I hope you have already installed Xamarin for Android.

Let's Start:
1) Go to File -> New -> Project
2) Select Android Application -> Give it a Name.
Create Hello World Android Application using Xamarin / Mono for Android

Before Starting, Have a look at Solution Explorer. Android Application contains Properties, References, Assets, Resources etc. Properties contains AssemblyInfo (Same as you have seen in C# project). References folder contains Assembly Files (DLL file). Mono.Android DLL assembly contains the C# binding to the Android API.
Mono for Android Solution Explorer
Resources folder contains Drawable folder(which contains icons and images for the application), Layout (provides designer surface for the application.). Resource.Designer.cs contains Autogenerated Code. As We are going to start from the basics, Delete main.axml Layout and Activity1.cs file from the Project.
3) Right Click on Layout ->Add -> New Item. 
Add New layout in Mono for Android / Xamarin
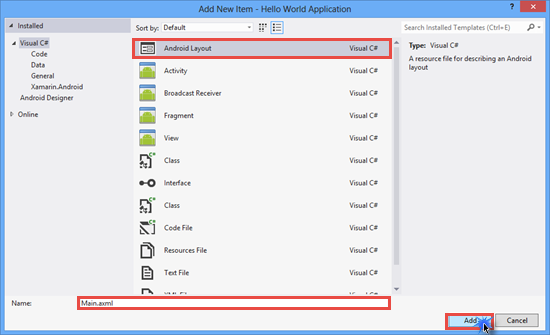
4) Add Android Layout (named as Man.axml) -> Click on Add and Select it.
Android Layout in Xamarin / Mono for Android

Layout in Xamarin / Mono for Android
5) Drop a Button control from the Toolbox.
Set Button text as Click Me! and id as @+id/btn_Hello.

Main.axml Code:
<?xml version="1.0" encoding="utf-8"?>
<LinearLayout xmlns:android="http://schemas.android.com/apk/res/android"
    android:orientation="vertical"
    android:layout_width="fill_parent"
    android:layout_height="fill_parent"
    android:minWidth="25px"
    android:minHeight="25px">
    <Button
        android:text="Click Me!"
        android:layout_width="fill_parent"
        android:layout_height="wrap_content"
        android:id="@+id/btn_Hello" />
</LinearLayout>
6) Add New item -> Select Activity -> Click on Add.
Add Activity in Mono for Android / Xamarin
Activity1.cs Code:
using System;
using System.Collections.Generic;
using System.Linq;
using System.Text;

using Android.App;
using Android.Content;
using Android.OS;
using Android.Runtime;
using Android.Views;
using Android.Widget;

namespace Hello_World_Application
{
    //Set the Label = "Hello World Application" which is displayed on the Top of the Application(in Title)
    //Set MainLauncher = true makes this Activity as a Main Activity and Application starts from this Activity.
    //Set Icon using Icon = "@drawable/icon"
    [Activity(Label = "Hello World Application", MainLauncher = true, Icon = "@drawable/icon")]
    public class Activity1 : Activity
    {
        //Creating Instance of Button
        Button btn_Hello;
        protected override void OnCreate(Bundle bundle)
        {
            base.OnCreate(bundle);

            //SetContentView
            SetContentView(Resource.Layout.Main);
            //Get btn_Hello Button control from the Manin.axml Layout.
            btn_Hello = FindViewById<Button>(Resource.Id.btn_Hello);
            //Creating Click event of btn_Hello
            btn_Hello.Click += btn_Hello_Click;
        }
        //btn_Hello Click Event
        void btn_Hello_Click(object sender, EventArgs e)
        {
            //Display a Toast Message on Clicking the btn_Hello
            Toast.MakeText(this, "Hello World Application by Anoop", ToastLength.Short).Show();
        }
    }
}
7) Build and run the Application. Start emulator image if not started. Select the Running devices and then click on OK. 
Note: Emulator takes lot of time to startup. Enable USB Debugging on your Android Device and run your Application on Device directly which is much faster as compared to debugging on emulator.

Start an Emulator in Xamarin / mono for Android
Final Preview:

[Download Source Code via Google Drive]
Watch Video:

Monday, 24 November 2014

RowDataBound Event in GridView in ASP.Net

This example shows how to use RowDataBound Event in a GridView for highlighting the Rows or Cell in ASP.NET. This example is helpful in situations where you have to Highlight the GridView Rows or cell based on specific condition. For demonstration, I have created a database (named Database.mdf) in which we have a table (named tbl_Employee).

Table Schema used in this Example:

CREATE TABLE [dbo].[tbl_Employee] (
    [Id]     INT          NOT NULL,
    [Name]   VARCHAR (50) NULL,
    [City]   VARCHAR (50) NULL,
    [Salary] INT          NULL,
    PRIMARY KEY CLUSTERED ([Id] ASC)
);
Let's Begin:
1) Drop a GridView Control from the toolbox and set the AutoGenerateColumns property to false.
2) Add a Columns Collection (element) to manage the collection of Column fields.
3) Inside the Columns tag, add a column field (BoundField) that displays the value of a field in a data source.
4) Set the DataField property to the name of the column in the table for binding to the BoundField object and set the HeaderText value for displaying it on the GridView's Header.
5) Add RowDataBound Event in GridView.

Default.aspx Code:
<form id="form1" runat="server">
    <div>
        <asp:GridView ID="GridView1" runat="server" CellPadding="6" AutoGenerateColumns="False" OnRowDataBound="GridView1_RowDataBound">
            <Columns>
                <asp:BoundField DataField="Id" HeaderText="Id"/>
                <asp:BoundField DataField="Name" HeaderText="Name"/>
                <asp:BoundField DataField="City" HeaderText="City"/>
                <asp:BoundField DataField="Salary" HeaderText="Salary"/>
            </Columns>
        </asp:GridView>
    </div>
</form>
In this Example, I am going to Highlight the complete Row for the Employee who have Salary less than 10000.

Default.aspx.cs Code:
using System;
using System.Web.UI.WebControls;
using System.Data;
using System.Data.SqlClient;
using System.Configuration;
using System.Drawing;

public partial class _Default : System.Web.UI.Page
{
    SqlConnection con;
    //Connection String from Web.config file
    string cs = ConfigurationManager.ConnectionStrings["DBCS"].ConnectionString;
    protected void Page_Load(object sender, EventArgs e)
    {
        if(!IsPostBack)
        {
            ShowData();
        }
    }
    //method for Displaying Data in Gridview
    protected void ShowData()
    {
        DataTable dt = new DataTable();
        con = new SqlConnection(cs);
        SqlDataAdapter adapt = new SqlDataAdapter("select * from tbl_Employee",con);
        con.Open();
        adapt.Fill(dt);
        con.Close();
        GridView1.DataSource = dt;
        GridView1.DataBind();
    }
    //RowDataBound Event
    protected void GridView1_RowDataBound(object sender, GridViewRowEventArgs e)
    {
        //Checking the RowType of the Row
        if(e.Row.RowType==DataControlRowType.DataRow)
        {
            //If Salary is less than 10000 than set the row Background Color to Cyan
            if(Convert.ToInt32(e.Row.Cells[3].Text)<10000)
            {
                e.Row.BackColor = Color.Cyan;
            }
        }
    }
}
Preview:
RowDataBound Event in GridView image1

Example 2:
Suppose, We have to highlight the Name of Employee not the Entire Row of the Gridview. We can achieve this using the Code given below:
protected void GridView1_RowDataBound(object sender, GridViewRowEventArgs e)
{
        //Checking the RowType of the Row
        if (e.Row.RowType == DataControlRowType.DataRow)
        {
            //If Salary is less than 10000 than set the Cell BackColor to Red and ForeColor to White
            if (Convert.ToInt32(e.Row.Cells[3].Text) < 10000)
            {
                e.Row.Cells[1].BackColor = Color.Red;
                e.Row.Cells[1].ForeColor = Color.White;
            }
        }
}
Preview:
RowDataBound Event in GridView Image2
I hope you like it. Thanks.
[Download Source Code via Google Drive]

Thursday, 13 November 2014

Display Number of Online Users in ASP.NET

All of us have seen many Websites displaying the number of online users. In this Article, We will learn how to Display Number of Online Users in ASP.NET Web Application / WebSite.

Let's Begin:
1) Go to File -> New -> Website -> Select ASP.NET Empty Web Site
2) Right Click on Website Project (in Solution Explorer) -> Add -> Click on Add New Item
3) Select Global Application Class (Global.asax) -> Click on Add Button.

Global.asax

You will see various events of Global.asax file like Application_Start, Application_End etc. Application_Start event called once when application starts. Session_Start event called every time when a new session is start. Session_End event called when a user session ends. In Application_Start Event, We will initialize our Application state variable.

Global.asax Code:

<%@ Application Language="C#" %>

<script runat="server">

    void Application_Start(object sender, EventArgs e)
    {
        // Code that runs on application startup
        Application["TotalOnlineUsers"] = 0;
    }
   
    void Application_End(object sender, EventArgs e)
    {
        //  Code that runs on application shutdown

    }
       
    void Application_Error(object sender, EventArgs e)
    {
        // Code that runs when an unhandled error occurs

    }

    void Session_Start(object sender, EventArgs e)
    {
        // Code that runs when a new session is started
        Application.Lock();
        Application["TotalOnlineUsers"] = (int)Application["TotalOnlineUsers"] + 1;
        Application.UnLock();
    }

    void Session_End(object sender, EventArgs e)
    {
        // Code that runs when a session ends.
        // Note: The Session_End event is raised only when the sessionstate mode
        // is set to InProc in the Web.config file. If session mode is set to StateServer
        // or SQLServer, the event is not raised.
        Application.Lock();
        Application["TotalOnlineUsers"] = (int)Application["TotalOnlineUsers"] - 1;
        Application.UnLock();
    }
      
</script>
In Web.config file, Add SessionState within system.web element. By Default Session uses Cookies (cookieless="false") and Default timeout period is of 20 minutes.

<system.web>
<sessionState mode="InProc" cookieless="false" timeout="20"></sessionState>
</system.web>
4) Add a Webform and drop a label control from the Toolbox.

Default.aspx Code:

<form id="form1" runat="server">
    <div>
    <p>No. of Online Users:<asp:Label ID="Label1" runat="server" Text="Label" ForeColor="#CC0000"></asp:Label></p>
    </div>
</form>
Default.aspx.cs:

protected void Page_Load(object sender, EventArgs e)
{
        Label1.Text = Application["TotalOnlineUsers"].ToString();
}
Run the Application (ctrl+ F5). For checking, copy the url and paste it in the new instance of different browser. When a visitor visit your website, a new session is started for him and Application["TotalOnlineUsers"] variable increased by 1. When user session expires than Application["TotalOnlineUsers"] variable decreased by 1.
Preview:
Online user in Asp.net
We can also use Cookieless session by setting cookieless property to true.

<sessionState mode="InProc" cookieless="true" timeout="20"></sessionState>
On running the application, you will see Session ID in URL which is different for all users, sessions, for the new instance of different browser. The session ID is embedded in the URL in the format shown below.
http://yourserver/(session ID here)/default.aspx

Preview:
Online user in Asp.Net
Hope you like it. Thanks. 
[Download Source Code via Google Drive]

Video:

Subscribe us on YouTube

Subscribe Now

Popular Posts

Contact us

Name

Email *

Message *

Like us on Facebook