Support us on YouTube by Subscribing our YouTube Channel. Click here to Subscribe our YouTube Channel

Sunday, 14 December 2014

AutoCompleteTextView in Xamarin

AutoCompleteTextView is an Editable TextView used for displaying suggestion when user starts typing in the control. Suggestion is displayed in a drop down menu and when user select the item from the drop down list, the selected text is displayed in a TextView. Before starting, I suggest you to read my previous Article.


Let's Start:

Method 1:(using Default Android Resources)
1) Create New Android Application.

2) Drop TextView, AutoCompleteTextView(with id="@+id/autoComplete1") and a Button control(with id="@+id/btn_Submit" and text="Submit") on Layout i.e. Main.axml
Main.axml Source Code:
<?xml version="1.0" encoding="utf-8"?>
<LinearLayout xmlns:android="http://schemas.android.com/apk/res/android"
    android:orientation="vertical"
    android:layout_width="fill_parent"
    android:layout_height="fill_parent">
    <TextView
        android:text="Enter Name"
        android:textAppearance="?android:attr/textAppearanceMedium"
        android:layout_width="fill_parent"
        android:layout_height="wrap_content"
        android:id="@+id/textView1"
        android:padding="5dp" />
    <AutoCompleteTextView
        android:layout_width="fill_parent"
        android:layout_height="wrap_content"
        android:id="@+id/autoComplete1" />
    <Button
        android:text="Submit"
        android:layout_width="fill_parent"
        android:layout_height="wrap_content"
        android:id="@+id/btn_Submit" />
</LinearLayout>
In Activity1.cs, Create a String Array (named as names) used for Displaying AutoComplete Suggestion and an ArrayAdapter for filling the View i.e. AutoCompleteTextView with the list of names(Array). We have also created a btn_Submit.Click event. On Clicking the btn_Submit it will display the text present in autoComplete1 AutoCompleteTextView in a Toast message and if AutoCompleteTextView is empty than Display a Toast Message(in other words Please Enter Name!).
Activity1.cs Code:
using Android.App;
using Android.Widget;
using Android.OS;

namespace AutoCompleteTextViewExample
{
    [Activity(Label = "AutoCompleteTextViewExample", MainLauncher = true, Icon = "@drawable/icon")]
    public class Activity1 : Activity
    {
        //Creating Instance of AutoCompleteTextView and Button
        AutoCompleteTextView autoComplete1;
        Button btn_Submit;
        protected override void OnCreate(Bundle bundle)
        {
            base.OnCreate(bundle);
            //setting the view for the Activity
            SetContentView(Resource.Layout.Main);
            //Get autoComplete1 AutoCompleteTextView and btn_Hello Button control from the Main.axml Layout.
            autoComplete1 = FindViewById<AutoCompleteTextView>(Resource.Id.autoComplete1);
            btn_Submit = FindViewById<Button>(Resource.Id.btn_Submit);

            //string array used for displayling AutoComplete Suggestion
            var names = new string[] {"Anoop","Arjit","Akshay","Ankit","Rakesh"};
            //Use ArrayAdapter for filling the View i.e. AutoCompleteTextView with the list of names(Array).
            //Use SimpleSpinnerItem(Predefined layout in Android Resources) for displaying the dropdown list
            ArrayAdapter adapter = new ArrayAdapter<string>(this,Android.Resource.Layout.SimpleSpinnerItem,names);
            autoComplete1.Adapter = adapter;

            btn_Submit.Click += btn_Submit_Click;
        }
        //btn_Submit Click Event
        void btn_Submit_Click(object sender, System.EventArgs e)
        {
            //Checking if autoComplete1.Text is not empty
            if (autoComplete1.Text != "")
            {
                Toast.MakeText(this, "Name Entered =" + autoComplete1.Text, ToastLength.Short).Show();
            }
            else
            {
                Toast.MakeText(this, "Please Enter Name!", ToastLength.Short).Show();
            }
        }
    }
}
Preview:


Method 2:(Using Custom Resources)
In above example, We have used SimpleSpinnerItem for displaying the list in AutoCompleteTextView but we can also create Custom Resouces for displaing the Auto Suggested list.
Let's Add a new Layout(named as ListName.axml) and Drop TextView Control on it. Adjust textColor, textSize, padding etc according to your need.

ListName.axml Code:
<?xml version="1.0" encoding="utf-8"?>
<TextView xmlns:android="http://schemas.android.com/apk/res/android"
    android:text="Text"
    android:layout_width="fill_parent"
    android:layout_height="wrap_content"
    android:id="@+id/textView1"
    android:padding="5dp"
    android:textSize="20dp"
    android:textColor="@android:color/black" />
Go to Activity1.cs and in ArrayAdapter, use the Custom Layout Resource which we have created. Rest of the code remains same.
ArrayAdapter adapter = new ArrayAdapter<string>(this, Resource.Layout.ListName, names);
Preview:
Hope you like it. Thanks.
[Download Source Code via Google Drive]

Sunday, 7 December 2014

Creating Splash Screen for Android App in Xamarin

Splash screen is an image that appears while an application is loading. Splash Screens are typically used to notify the user that program is in the process of loading. In this Article, We will learn How to create Splash Screen for Android Application in Xamarin / Mono for Android. In my previous Article, We saw How to create Hello World Application in Xamarin. Before starting, I suggest you to read my previous Article.


Let's Begin:
1) Add two images(icon.png for icon and splash.png for displaying image on Splash Screen) in Resources\Drawable folder.
Splash Screen in Xamarin image 1
2) Right Click on Values folder present in Resources folder of project -> Add -> New item.
Splash Screen in Xamarin Image 2
3) Select XML File and give it a Name Styles.xml. In Android Application, We can assign themes to an Activity.
Splash Screen in Xamarin Image 3

Styles.xml Code:
<?xml version="1.0" encoding="utf-8" ?>
<resources>
  <style name="Theme.Splash" parent="android:Theme">
    <item name="android:windowBackground">@drawable/splash</item>
    <item name="android:windowNoTitle">true</item>
  </style>
</resources>
In above Code, We have created a Theme named as Theme.Splash and Set the Window Background as splash.png image present in Drawable folder. We have also disabled title bar by Setting windowNoTitle to true.
4) Add new Activity. Right Click on Project -> Go to Add -> New Item.
Splash Screen in Xamarin Image 3
Select Activity and Give it a name SplashScreen.cs
Splash Screen in Xamarin Image 4

SplashScreen.cs Code:
using Android.App;
using Android.OS;
using System.Threading;

namespace Splash_Screen
{
    //Set MainLauncher = true makes this Activity Shown First on Running this Application
    //Theme property set the Custom Theme for this Activity
    //No History= true removes the Activity from BackStack when user navigates away from the Activity
    [Activity(Label="Splash Screen App",MainLauncher=true,Theme="@style/Theme.Splash",NoHistory=true,Icon="@drawable/icon")]
    public class SplashScreen : Activity
    {
        protected override void OnCreate(Bundle bundle)
        {
            base.OnCreate(bundle);
            //Display Splash Screen for 4 Sec
            Thread.Sleep(4000);
            //Start Activity1 Activity
            StartActivity(typeof(Activity1));
        }
    }
}
In Activity1.cs, We have added a Button with Id="btn_Hello" from ToolBox and Added Click Event and Display Toast message on Clicking the Button.
Activity1.cs Code:
using System;
using Android.App;
using Android.OS;
using Android.Widget;

namespace Splash_Screen
{
    [Activity(Label = "Hello World App")]
    public class Activity1 : Activity
    {
        Button btn_Hello;
        protected override void OnCreate(Bundle bundle)
        {
            base.OnCreate(bundle);
            //SetContentView
            SetContentView(Resource.Layout.Main);
            //Get btn_Hello Button control from the Manin.axml Layout.
            btn_Hello = FindViewById<Button>(Resource.Id.btn_Hello);
            //Creating Click event of btn_Hello
            btn_Hello.Click += btn_Hello_Click;
        }
        //btn_Hello Click Event
        void btn_Hello_Click(object sender, EventArgs e)
        {
            //Display a Toast Message on Clicking the btn_Hello
            Toast.MakeText(this,"Hello World App by Anoop",ToastLength.Short).Show();
        }
    }
}
Build and Run the Application.
Final Preview:
Splash Screen in Xamarin / Mono for Android
I hope you like it. Thanks.
[Download Source Code via Google Drive]
Watch Video:

Wednesday, 3 December 2014

Hello World Application in Xamarin

In this Article, We will learn How to create a Simple Hello World Application for Android Device using Xamarin / Mono for Android. Before Starting, I hope you have already installed Xamarin for Android.

Let's Start:
1) Go to File -> New -> Project
2) Select Android Application -> Give it a Name.
Create Hello World Android Application using Xamarin / Mono for Android

Before Starting, Have a look at Solution Explorer. Android Application contains Properties, References, Assets, Resources etc. Properties contains AssemblyInfo (Same as you have seen in C# project). References folder contains Assembly Files (DLL file). Mono.Android DLL assembly contains the C# binding to the Android API.
Mono for Android Solution Explorer
Resources folder contains Drawable folder(which contains icons and images for the application), Layout (provides designer surface for the application.). Resource.Designer.cs contains Autogenerated Code. As We are going to start from the basics, Delete main.axml Layout and Activity1.cs file from the Project.
3) Right Click on Layout ->Add -> New Item. 
Add New layout in Mono for Android / Xamarin
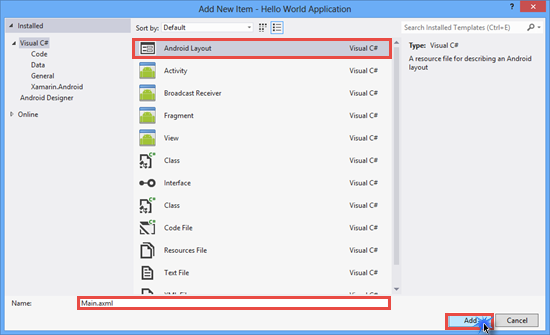
4) Add Android Layout (named as Man.axml) -> Click on Add and Select it.
Android Layout in Xamarin / Mono for Android

Layout in Xamarin / Mono for Android
5) Drop a Button control from the Toolbox.
Set Button text as Click Me! and id as @+id/btn_Hello.

Main.axml Code:
<?xml version="1.0" encoding="utf-8"?>
<LinearLayout xmlns:android="http://schemas.android.com/apk/res/android"
    android:orientation="vertical"
    android:layout_width="fill_parent"
    android:layout_height="fill_parent"
    android:minWidth="25px"
    android:minHeight="25px">
    <Button
        android:text="Click Me!"
        android:layout_width="fill_parent"
        android:layout_height="wrap_content"
        android:id="@+id/btn_Hello" />
</LinearLayout>
6) Add New item -> Select Activity -> Click on Add.
Add Activity in Mono for Android / Xamarin
Activity1.cs Code:
using System;
using System.Collections.Generic;
using System.Linq;
using System.Text;

using Android.App;
using Android.Content;
using Android.OS;
using Android.Runtime;
using Android.Views;
using Android.Widget;

namespace Hello_World_Application
{
    //Set the Label = "Hello World Application" which is displayed on the Top of the Application(in Title)
    //Set MainLauncher = true makes this Activity as a Main Activity and Application starts from this Activity.
    //Set Icon using Icon = "@drawable/icon"
    [Activity(Label = "Hello World Application", MainLauncher = true, Icon = "@drawable/icon")]
    public class Activity1 : Activity
    {
        //Creating Instance of Button
        Button btn_Hello;
        protected override void OnCreate(Bundle bundle)
        {
            base.OnCreate(bundle);

            //SetContentView
            SetContentView(Resource.Layout.Main);
            //Get btn_Hello Button control from the Manin.axml Layout.
            btn_Hello = FindViewById<Button>(Resource.Id.btn_Hello);
            //Creating Click event of btn_Hello
            btn_Hello.Click += btn_Hello_Click;
        }
        //btn_Hello Click Event
        void btn_Hello_Click(object sender, EventArgs e)
        {
            //Display a Toast Message on Clicking the btn_Hello
            Toast.MakeText(this, "Hello World Application by Anoop", ToastLength.Short).Show();
        }
    }
}
7) Build and run the Application. Start emulator image if not started. Select the Running devices and then click on OK. 
Note: Emulator takes lot of time to startup. Enable USB Debugging on your Android Device and run your Application on Device directly which is much faster as compared to debugging on emulator.

Start an Emulator in Xamarin / mono for Android
Final Preview:

[Download Source Code via Google Drive]
Watch Video:

Subscribe us on YouTube

Subscribe Now

Popular Posts

Contact us

Name

Email *

Message *

Like us on Facebook